1. Hive安装操作
1.1. Hive metastore远程模式安装部署
课程中采用远程模式部署hive的metastore服务。在node1机器上安装。
注意:以下两件事在启动hive之前必须确保正常完成。
- 选择某台机器提前安装mysql,确保具有远程访问的权限。
- 启动hadoop集群 确保集群正常健康
1.1.1. Hadoop中添加用户代理配置
| #修改hadoop 配置文件 etc/hadoop/core-site.xml,加入如下配置项 \ |
|---|
1.1.2. 上传安装包 并解压
| tar -zxvf apache-hive-3.1.2-bin.tar.gz -C /export/server/ cd /export/server/ ln -s apache-hive-3.1.2-bin/ hive # 解决Hive与Hadoop之间guava版本差异 cd /export/server/hive/ rm -rf lib/guava-19.0.jar cp /export/server/hadoop/share/hadoop/common/lib/guava-27.0-jre.jar lib/ |
|---|
1.1.3. 修改配置文件hive-env.sh
| cd /export/server/hive/conf cp hive-env.sh.template hive-env.sh vim hive-env.sh # 修改一下几处内容: 第48行 export HADOOP_HOME=/export/server/hadoop export HIVE_CONF_DIR=/export/server/hive/conf export HIVE_AUX_JARS_PATH=/export/server/hive/conf/lib |
|---|
1.1.4. 添加配置文件hive-site.xml
| vim hive-site.xml 添加以下内容: \ |
|---|
1.1.5. 上传MySQL驱动
| #上传mysql jdbc驱动到hive安装包lib下 mysql-connector-java-5.1.32.jar |
|---|
1.1.6. 初始化元数据
| cd /export/server/hive/ bin/schematool -initSchema -dbType mysql -verbos #初始化成功会在mysql中创建74张表 |
|---|
1.1.7. 创建hive存储目录
| hadoop fs -mkdir /tmp hadoop fs -mkdir -p /user/hive/warehouse hadoop fs -chmod g+w /tmp hadoop fs -chmod g+w /user/hive/warehouse |
|---|
1.2. metastore 的启动方式
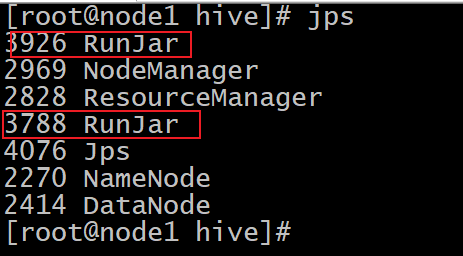
| cd /export/server/hive #前台启动 关闭ctrl+c ./bin/hive --service metastore #前台启动开启debug日志 ./bin/hive --service metastore --hiveconf hive.root.logger=DEBUG,console #后台启动 进程挂起 关闭使用jps+ kill -9 nohup ./bin/hive --service metastore & nohup ./bin/hive --service hiveserver2 & |
|---|
1.3. Hive Client、Beeline Client
1.3.1. 第一代客户端Hive Client
在hive安装包的bin目录下,有hive提供的第一代客户端 bin/hive。使用该客户端可以访问hive的metastore服务。从而达到操作hive的目的。
使用下面的命令启动hive的客户端:
/export/server/hive/bin/hive
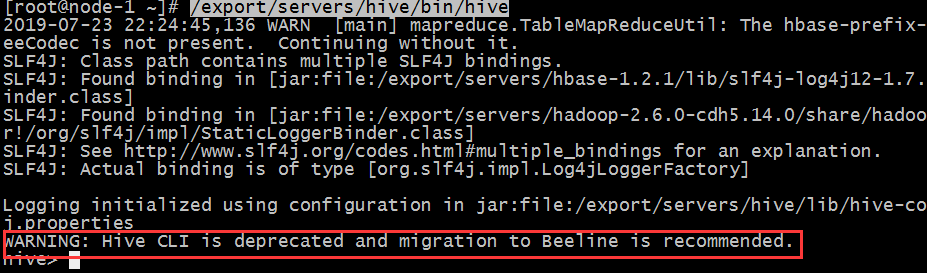
可以发现官方提示:第一代客户端已经不推荐使用了。
1.3.2. 第二代客户端Hive Beeline Client
hive经过发展,推出了第二代客户端beeline,但是beeline客户端不是直接访问metastore服务的,而是需要单独启动hiveserver2服务。
在hive运行的服务器上,首先启动metastore服务,然后启动hiveserver2服务。
nohup /export/server/hive/bin/hive --service metastore &
nohup /export/server/hive/bin/hive --service hiveserver2 &
使用beeline客户端进行连接访问。
/export/server/hive/bin/beeline
beeline> ! connect jdbc:hive1://node1:10000
Enter username for jdbc:hive1://node1:10000: root
Enter password for jdbc:hive1://node1:10000: *******(任意)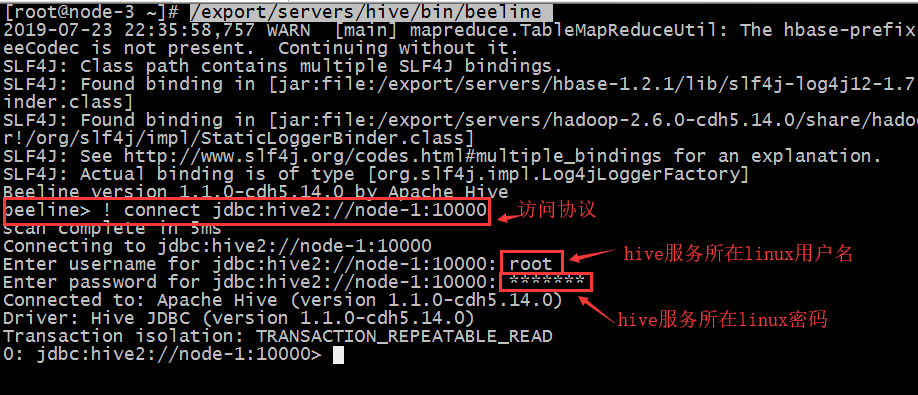
说明: 在其他的节点想要连接hive, 只需要有hive的beeline的客户端即可